Friday, April 15, 2011

Cake Decorators in the Philippines

http://www.flickrcc.bluemountains.net/flickrCC
I admire the skills of Professional Cake Decorators. They have earned the respect of the people through the works that they have created which shows their talent and passion for what they do.

1. Chef Heny Sison - She was my teacher and continues to be my inspiration until today. When I was younger, I used to watch her on TV because of the beautiful cakes she creates and of course the delicious desserts! She is a premier cake decorator and one of the well respected name in the culinary industry in the country.

2. Penk Ching - Her name is famous for cake decorating here in the Philippines. She has created really beautiful cakes for big personalities in the country. Together with her sister, they own Pastry Bin where they cater to a wide array of clients. I think she was even recognized internationally when she made a replica of the bird's nest stadium in the Beijing Olympics.

3. Mrs. Avelina Florendo - She is known to be the Philippine Cake Queen and a pioneer in cake decorating in the Philippines. I got to meet her before when we guested for a TV morning show and her personality was a charm. With our short chat she got me inspired into taking up a cake decorating course. She owns CSS Bakeshop in Cubao and has also made the cakes of some of the weddings of big personalities in the country.

4. Dexter's Bakeshop - I always pass by their bakeshop in Katipunan but I have learned the inspiring story of the founder. He has worked hard to teach himself the art of cake decorating and has made a name for himself.

Monday, April 11, 2011

Shelf Life of Rolled Fondant

Rolled Fondant
As I've learned from my decorating class, rolled fondant can last up to 6 months to 1 year in an airtight container at room temperature. It should not be placed in the refrigerator because when you bring it outside, it will moist.
http://www.flickrcc.bluemountains.net/flickrCC

From my research however, they have different views on the shelf life of fondant. Some say 1 - 2months if covered in room temperature. Others said it can be kept indefinitely because it doesn't get stale. Some said it can be refrigerated for storage but you have to let it stay at room temperature first before you can work on it.


Fondant Covered Cakes
http://www.flickrcc.bluemountains.net/flickrCC
For fondant covered cakes, it is a different thing. You can't keep this for too long. If cakes are already covered with fondant, it can last up to 3-4 days if there are no sensitive ingredients in your cake. But if there are, you can refrigerate the cake but again it will moist when you bring it out the refrigerator. The latter option is not really preferred for storing fondant cakes.

Saturday, April 9, 2011

3 Reasons Why Fondant Cracks

In our last practice session, the fondant cracked as I laid it on the cake. To fix this I tried rubbing a little amount of shortening on the cracks and pinched it together gently. I didn't know if this was correct but it improved.

I tried researching about how to fix this problem in cakes. I found this site, baking 911, where there are tips and basic information about cake decorating. So as I read about it, cracks are usually caused by:
1. dry fondant
2. thickly rolled fondant
3. the fondant was not rolled properly

To fix this according to them,
- you must moisten up the fondant by adding more shortening.
- you must roll it out to about 1/4 inch thick only
- also, when kneading fondant you should knead properly and not "under knead. To know that you kneaded it enough, they said to pinch the fondant and see if no crack will appear.
- tiny cracks can also be remedied through the pressing of the smoother or through the heat of your hands. try putting shortening in your fingers as you smoothen the fondant.
http://flickrcc.bluemountains.net/flickrCC/

So we're RIGHT after all! Next time I'll put into mind these tips to prevent cracks in fondant! Read this to know the full article and see other articles as well: Baking 911

Thursday, April 7, 2011

Practice Session 2: Birthday Cake

I had to practice again and had to try out the new tools for decorating. I was supposed to try out designing a layer cake but didn't have the energy and time so just made a 9 inch cake.

I wasn't able to take pictures of our session because my friend and I were so engrossed in designing and finishing the cake. I only got the picture of the finished product!

1. Making the Fondant
I made rolled fondant again and tried to improve on my mistakes the first time. This time, I lessened the amount of powdered sugar that I added to the mixture (2 cups less). The consistency is better I think than the first one. But I will still improve it the next time I make one.

2. Rolling out the Fondant
Again, I had a hard time rolling out the fondant and covering the cake. This time, I had to cover a bigger cake (9 inch cake). It was harder of course as it gets bigger, level 2! The first try of rolling the fondant, it stuck on the work table again even if I placed powdered sugar under it. For the second try, I tried putting MORE powdered sugar and every time I rolled the fondant out, I turned it to make sure it was not sticking as I rolled it out bigger! SUCCESS! It didn't stick anymore!

The problem was that when I laid it on the cake, cracks appeared! I think the fondant was a bit dry. OR was it because I kept turning it around as I rolled it out? It didn't improve even after using the fondant smoother. What we tried to do is rub a little shortening and tried to gently pinch the fondant to remove the cracks. It improved a little bit.

3. Designing the Fondant Cake
For the design, we tried out our new tools! We used the alphabet cutter, the number cutters, the flower and butterfly plunger cutters. It was so fun to use. We were just like playing!

We wanted all the letters to stand up, but maybe we rolled the fondant thin so it didn't stand up. For the numbers, we tried a thicker one and it did stand up! Cool!

We tried to make a birthday cake, we even invented a name for the cake! All who saw it asked, who is Kylie? Haha we also don't know!

Sunday, April 3, 2011

New Tools For Designing Fondant

Last Saturday, we went to a Food Expo and found very interesting tools for cake decorating. The items we saw were really cheap compared to my cake decorating tools hunt in the mall the last time. So we took advantage of this opportunity and went shopping for fondant tools!

We bought:
Alphabet and Number Cutters


Different Shapes Cutter

Flower and Butterfly Plunger Cutters

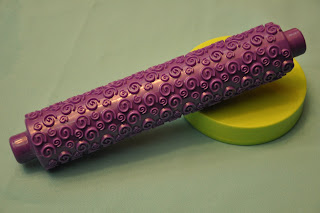
Spiral Pattern Roller


Fondant Ribbon Cutter/Embosser Set

Cant wait to use these new tools for the next practice session!

Sunday, March 27, 2011

Practice Session 1: Coloring Fondant, Covering a Cake, Using Cut out Shapes

Being a beginner in the decoration of cakes with fondant, the fondant we made did not turn out the way we wanted but it was ok because it will be part of our learning process. We were still able to use our greasy fondant. It was still ok to work with even if it was oily. Well our goal was to practice anyway so we used it for that.

I had a 6 inch Chocolate Cake and several Cupcakes baked for our Decorating with Fondant practice! We'll start with the small ones first and then maybe we can work our way up to the bigger and more complicated cakes!

1. Coloring the Fondant
To color the fondant, we used a gel based food coloring. This is usually used for icings of cakes. You will need a toothpick to color the fondant. Just dip the toothpick in the food coloring and put it to the fondant you want to color. Knead it thoroughly to color the fondant evenly.

2. Rolling out the fondant. Cover the Cake with Fondant
I remembered, like our lesson with dough, the work surface should be dusted so the fondant would not be sticking to the table. In our case, we used powdered sugar to dust the work area. This was the hardest thing that I had to do during the practice session. I had to roll and re-roll the fondant because it kept on sticking to the work surface. Then when I tried putting more powdered sugar to the surface, it worked! It didn't stick anymore! Another lesson I have learned in rolling fondants, you must roll the fondant from the middle going towards the outside. You should not roll it back and forth so the surface will be smooth.

I read from my research that for you to know the size of the fondant to roll out to cover a certain cake is to measure the diameter of the cake (6 inches) plus measure the height of the cake X 2 (4 inches x 2 = 8 inches). So when you add that up, the rolled fondant must be 14 inches in diameter to cover the 6-inch cake.

It would be nice if i had the Roll and Cut Mat, where you will just follow the pattern. But I had to do it using ruler. It was ok also, nothing beats going through it the hard way!

Then I placed a light syrup all over the cake to act as glue for the fondant. Some say that you can use buttercream icing also for that. I have yet to try that.

Then to put your rolled fondant to your cake, use your rolling pin to lift your fondant and gently lay it over your cake. Here is a video of how to do this. I watched this video and it helped me a lot!

http://www.youtube.com/watch?v=vecmy4nKT-A

3. Using cut out fondants
For the design of our cake, we just used my cookie cutters. Like cookies, we rolled out the fondant and used the cookie cutter to get the design we wanted. Then we played around with it and this is how it turned out in the end! We were so proud with ourselves after doing this. It took us around almost 3 hours to finish a cake, and some cupcakes too!


My friend also did a pictorial of the creations we made. It looks so nice in pictures! Until our next practice session!

Saturday, March 26, 2011

3 Ways To Fix The Not So Perfect Fondant Icing


Using the Rolled Fondant Recipe I had, I tried making fondant from scratch. As I have said, it has been a year ago since I've made one. Well that was with supervision so I was not sure how my fondant will be turning out. I don't remember quite well how we did it last year and my memory is really really bad!

Apple+peels
http://flickrcc.bluemountains.net/flickrCC/

With the help of my friend, we prepared all the ingredients and materials that we needed. I started making the rolled fondant and followed the procedures step by step. (see recipe and procedure in previous blog)
1. Put gelatin and water in a small glass container in a small pan of boiling water.
2. Add glucose, glycerin and shortening.
3. Mix in powdered sugar, mix with wooden spoon then knead.
* be careful with the glass that you will put in the boiling water, it must be heatproof!

I thought I was doing well, I kneaded the fondant after mixing with the wooden spoon. When I started kneading the fondant, I thought so far so good. Then there were still a lot of powdered sugar in the table that was not incorporated to the fondant that I was kneading, but the fondant was getting tougher already. I tried remembering what we did in our class if we mixed all the powdered sugar in the recipe but I couldn't remember! So I thought about it. I said to myself, this was the one indicated in the recipe so I should follow it in detail.

After a perspiring 20 minutes of kneading, I have already incorporated all the powdered sugar in my fondant. I guess I shouldn't have mixed all the powdered sugar after all. The fondant was crumbly and it was breaking apart. Not the kind of fondant I saw when we made it in school! Not Play Doh consistency!

Anyway, we just kept this first and I tried to research what possible remedies that can be done for the not so perfect fondant. 

This is what i found out: Tips and Techniques in Making Fondant Icing!
1. If the fondant is crumbly, you can try putting a little amount of water until you get the right consistency
2. If the fondant is sticky, you can add a little powdered sugar to make it right
3. If the you have added too much sugar or if the fondant has started drying up because of too much air exposure, you can add a little vegetable shortening.

I used the third one. I tried adding more vegetable shortening and it did had a better consistency. But I think I put in too much that it became greasy! We were still able to use it though for practice!

Friday, March 25, 2011

Rolled Fondant Recipe

The Fondant Recipe that I will be using is the one I learned from my school before, Heny Sison Culinary School. This is the Rolled Fondant Recipe that Chef Heny gave us:

Ingredients:
1 tbsp unfalvored gelatin
1/4 cup cold water
1/2 cup glucose
1 tbsp glycerin
2 tbsp shortening
8 2/7 cups powdered sugar

Procedure:
1. Put gelatin and water in a small glass container in a small pan of boiling water. Leave until softened, then stir until dissolved.
2. Add glucose and glycerin. Stir over low heat until well blended.
3. Add shortening.
4. Make a well in the center of the powdered sugar. Pour the liquid into the sugar. Stir with a wooden spoon, then mix with hands until smooth. Dust the table and the rolling pin with cornstarch to roll fondant.

When I checked my book, The Art of Cakes by Noga Hiltron they had the same recipe! I also researched for other recipes and the recipe I found from Wilton is also almost the same. http://www.wilton.com/recipe/Rolled-Fondant-1

If you want less trouble in making fondant, there are ready made fondants that are available in the market. It is even available in different colors but maybe you can buy the white one and just color it yourself. Of course store-bought fondant is more expensive but it will save you the time.

Wednesday, March 23, 2011

Shopping For Cake Decorating Tools

To start my fondant decorating adventure, I bought some cake decorating tools. With the help of my book and the memory of my class before, I had an idea which things to buy first. I purchased a book almost 2 years ago about Cake Decorating with Fondant but I used to just enjoy looking at the pictures of the beautiful cakes. Now thankfully it will be put to good use! I even bought a Magazine from Wilton before but haven't really applied them. Well now is the time!

It was fun going to baking shops and looking for the things that we can use. It took me some time figuring out what to buy first keeping in mind my budget. But it was tempting to buy all those artsy-crafty tools! They were like the ones used for PLAY DOH! Anyway, I had to buy something to start the fondant experience.

The 4 Things I bought to start my Fondant Cake Decorating Adventure:

1. Small Rolling Pin - For rolling small amounts of fondant. It was cool because it had ring bands on each of the ends so that when you roll out the fondant, it will be even.

2. Large Rolling Pin - For rolling bigger amounts of fondant to be used for covering cakes. I think I chose a nice rolling pin because it said that it was "non-stick". When I thought non stick was only for cooking pans!

3. Fondant Smoother - It's used for smoothing out the fondant. When I first saw that before, I thought of what the carpenters use when they smoothen the cement on walls!

4. Graver Tool - This is used to carve or put small details on fondant. I wanted to buy the 10 pc Fondant Tool Set from Wilton but due to budget constraint, I convinced myself to buy a cheaper version. Maybe I'll buy that when I become more professional in the future!

The tool set included: Bone Tool, Shell & Blade Tool, Ball Tool, Scallop & Comb Tool, Serrated & Tapered Cone Tool, Tapered Cones 5/6 Tool, Bulbulous Cone Tool, Flower/Leaf Shaper Tool

If you're looking for cake decorating tools, Wilton would be the best choice for the brand to buy but it is quite expensive. But I think it is really worth it for the variety they offer and the quality of the products.
Click here to know more about tools for fondant decorating

I even went to a Toy Store to look for possible tools. Since I thought fondant is like clay, I might see Play Doh materials that we can use. Sadly, they don't sell the tools separately. The tools and the Play Doh comes in package but the toys were cool and I think they can be used for fondant as well!

Then I went to a Craft Store. Maybe I can buy some things that sculptors use. Fondant is like sculpting too right? Or not! I didn't find anything there yet.

So there we have the books. We have the tools. Next, practice how to make the fondant! I hope I can still remember it!

Monday, March 21, 2011

Making Fondant Again After A Year

It was a year ago since I have learned how to make fondant from my teacher Chef Heny Sison. I have never practiced since. But now, I've decided to practice and put it to good use. Join me as I try to learn how to decorate cakes using fondant icing!


This was the cake I made during my Fondant Decorating Class last year. We made everything from scratch! After completing it, you'll get a feeling of pride and awe with the work you've created. For the course that I took then, it was just a one day class so I got to learn only few of the basic techniques using fondant. Well I'll just work from there. I'll just do research and just practice, practice and practice!